


We have all stood in that vast warehouse, appreciating the modular brilliance of Swedish design while simultaneously dreading the idea that our living room will look identical to a college dormitory or a starter apartment. As a designer, I frequently navigate this tension with clients who want high-end bespoke joinery on a ready-made budget. The solution lies in strategic customization. By utilizing third-party **ikea add ons**, you can retain the functional, cost-effective internal carcasses of these units while completely transforming their external aesthetic.
Key Features to Look For
Before you begin swapping out components, consider these critical factors to ensure your customization looks intentional rather than cobbled together:
- System Compatibility: Verify if your base unit is current (e.g., METOD/SEKTION) or discontinued (FAKTUM), as hinge drillings differ significantly.
- Material Weight: Custom fronts often weigh more than standard foil-wrapped particleboard; ensure your hinges and wall anchors can support the added load.
- Proportion & Scale: When adding legs to a cabinet, ensure the height ratio between the storage box and the legs maintains visual balance (typically a 2:1 or 3:1 ratio).
- Finish Durability: For high-traffic areas like kitchens, prioritize lacquered or laminate finishes over untreated wood veneers.
Curating the Aesthetic: Fronts and Side Panels
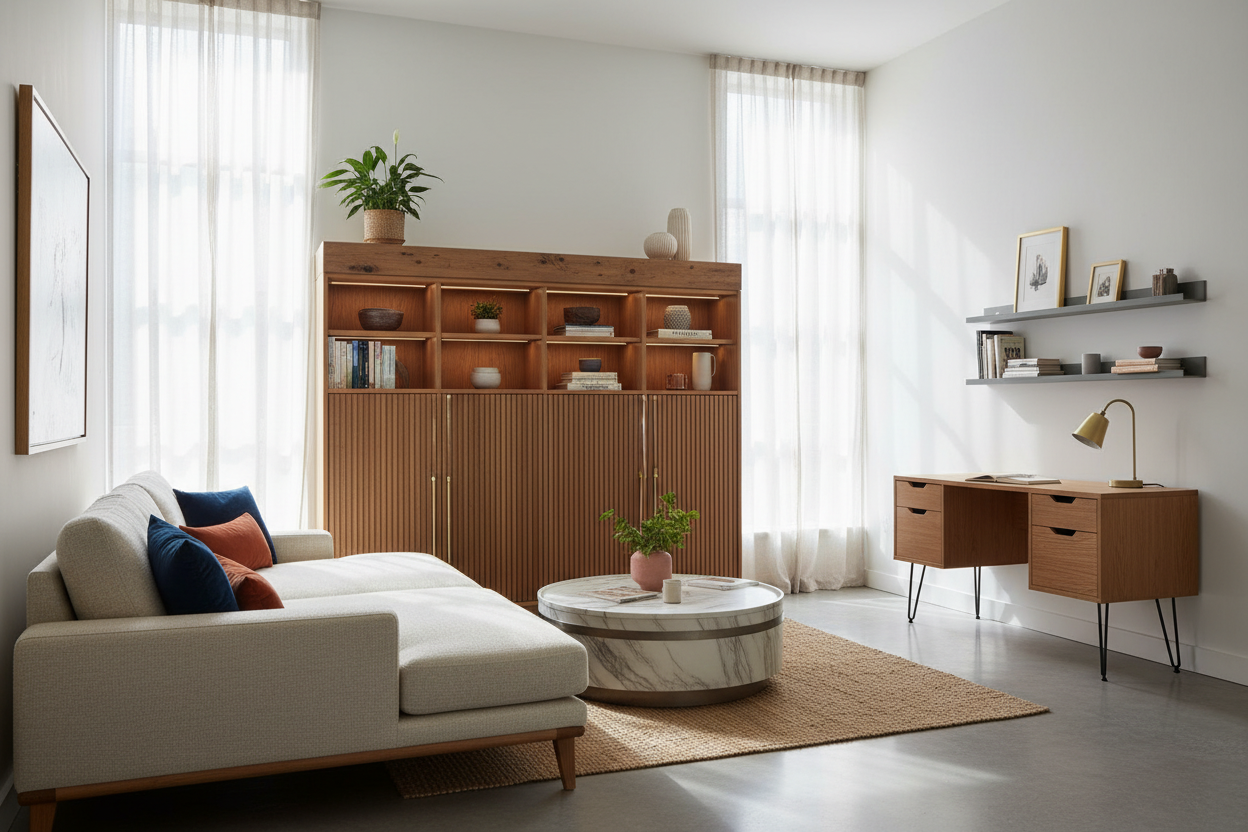
The most dramatic shift in visual language comes from replacing the standard door and drawer fronts. In high-end interior design, we focus heavily on texture and light absorption. Standard laminate tends to reflect light in a way that can feel synthetic. By upgrading to matte-lacquered fronts or natural wood veneers, you introduce a tactile quality that elevates the entire room.
When selecting these components, pay close attention to the edges. A hallmark of luxury furniture is seamless edge banding or chamfered detailing. If you are aiming for a built-in look, purchasing matching side panels (cover panels) is non-negotiable. These panels should sit flush with your new doors to conceal the white or birch carcass underneath, creating a monolithic silhouette.
The Jewelry of the Room: Hardware Selection
Never underestimate the power of hardware. In design school, we call knobs and pulls the 'jewelry' of the cabinetry. Standard ikea furniture accessories are functional, but they often lack weight and character. Replacing a standard brushed steel handle with a heavy, knurled brass knob or a leather pull instantly changes the narrative of the piece.
Ergonomics and Placement
Beyond style, consider the ergonomics. For heavy drawers (like those used for pots and pans), ensure the pull offers enough grip. A tiny finger-pull might look sleek, but it becomes a nuisance in a working kitchen. Furthermore, the placement of the hardware dictates the style; centering knobs suggests a traditional cottage vibe, while edge-mounted tabs scream modern minimalism.
Elevating the Silhouette: Custom Legs and Bases
Standard plinths can make furniture feel heavy and blocky. Swapping a kick-plate for slender, mid-century modern legs introduces 'negative space' beneath the unit. This allows light to travel under the furniture, making small rooms feel larger and more airy. However, be mindful of structural integrity. If you are spanning a long distance (like a four-bay Bestå TV unit), you must install support legs in the center to prevent the bottom panel from bowing over time.
Lessons from My Own Projects
I want to share a specific reality check from a project I managed in a pre-war apartment last year. We were upgrading a Pax wardrobe with heavy, shaker-style custom doors painted in a deep navy. It looked stunning in the mock-up, but during installation, I learned a hard lesson about 'hinge fatigue.'
Because the custom MDF doors were about 30% heavier than the standard IKEA doors, the unit started to list forward slightly—not enough to fall, but enough to throw off the vertical gaps between the doors. No amount of hinge adjustment fixed it. We had to go back and anchor the wardrobe to the wall with much more aggressive toggle bolts than the manual suggested to square the frame back up. The takeaway? When you upgrade the quality of the 'skin,' you must reinforce the skeleton. Always anchor your units, even if you think they are stable.
Conclusion
Transforming mass-produced furniture into a personalized statement piece is one of the most satisfying design hacks available today. It bridges the gap between budget constraints and the desire for a sophisticated, curated home. By selecting the right materials and paying attention to the finer details of hardware and stance, you can create a space that feels uniquely yours.
Frequently Asked Questions
Will using third-party add-ons void my IKEA warranty?
Generally, the warranty applies to the structural integrity of the original product. If a third-party door is too heavy and damages the hinge or carcass, that specific damage likely won't be covered. However, it does not usually void the warranty on the entire system unless the modification caused the failure.
How do I know if custom legs will fit my sofa?
Most IKEA sofas use a standard M8 hanger bolt (8mm). If your sofa is from a different region or a very old model, double-check the thread size. Many add-on manufacturers sell adapter plates to convert different fittings to the standard M8 size.
Can I paint the add-on parts myself?
Yes, specifically if you order 'raw' or 'paint-ready' MDF or wood parts. This is a fantastic way to color-drench a room (matching the cabinet to the wall color). Just ensure you use a high-quality primer and a durable enamel paint for a finish that resists chipping.

Leave a comment
This site is protected by hCaptcha and the hCaptcha Privacy Policy and Terms of Service apply.