


I spent three years staring at a 14-inch gap between my fireplace and the wall. I tried a floor plant. I tried a stack of vintage suitcases. I even tried a floor lamp that just looked like a lonely stick in a dark corner. Nothing worked because the architecture was fundamentally at odds with my furniture. If you are currently wrestling with a similar layout, you know the frustration of trying to find a living room built in tv cabinet solution that doesn't look like an afterthought.
The moment I stopped trying to 'find' a piece of furniture and started planning a permanent installation, the room finally made sense. It is the difference between a suit off the rack and one that is bespoke; the fit changes how the entire room carries itself. We are going to talk about why those gaps are killing your vibe and how to fix them for good.
Quick Takeaways
- Built-ins eliminate the 'dust bunny graveyards' found in narrow alcoves.
- Custom depths allow you to hide bulky AV receivers that freestanding consoles can't handle.
- Wall-to-wall cabinetry creates a visual anchor that makes small rooms feel wider.
- Combining open and closed storage balances functionality with personality.
The Problem With the 'Fireplace Gap'
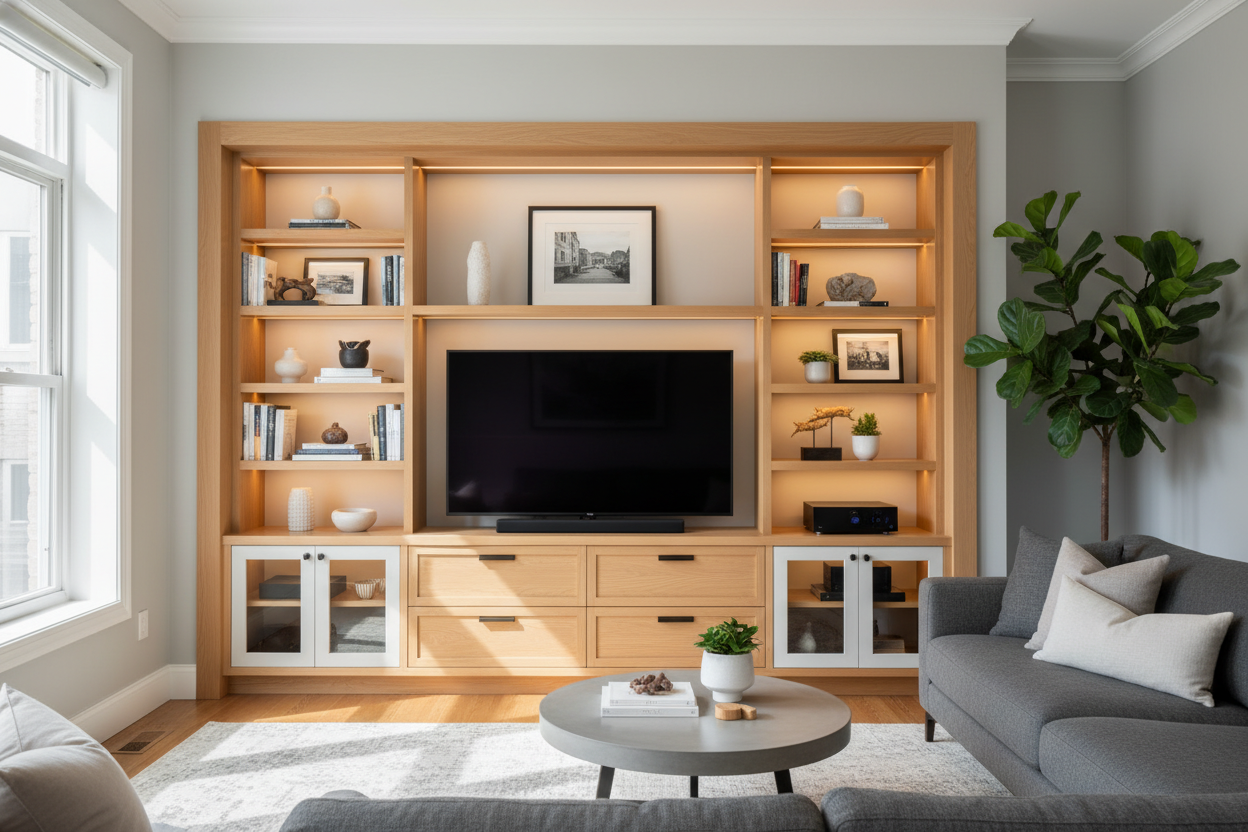
Most modern homes suffer from what I call the 'Fireplace Gap.' It is that recessed niche on either side of the chimney breast that is too wide for a chair but too narrow for a standard media console. When you try to center a television in these spaces using a regular stand, you are inevitably left with 4 to 6 inches of dead space on either side. It is a magnet for tangled black wires and cat hair.
This architectural quirk ruins a cohesive living room aesthetic because it creates visual friction. Your eyes are drawn to the gaps rather than the design. In my old place, the fireplace was off-center by about 18 inches. Every time I sat on the sofa, I felt like the room was tilting to the left. A freestanding unit just highlighted the asymmetry. A built-in, however, allows you to cheat the proportions, using cabinetry to visually balance the weight of the fireplace and make the entire wall feel intentional.
I have seen people try to fill these gaps with floating shelves from big-box stores, but without the bottom cabinetry to anchor them, they just look like they are drifting away. You need that solid base to ground the media center design and provide a home for the heavy tech that inevitably follows a TV.
Why Freestanding Consoles Ruin Your Media Center Design
Freestanding furniture is fantastic for many things. I love a solid wood modern sideboard when it is sitting against a long, flat wall in a dining room. It has legs, it has breath, and it looks like a piece of art. But shove that same sideboard into a recessed alcove and it suddenly looks claustrophobic. The legs make it hard to vacuum underneath, and the top surface never quite reaches the walls, leaving a 'no man's land' where your remote will eventually fall and disappear forever.
Media room built in cabinets solve the 'square peg in a round hole' problem. When you go custom, you are sealing those gaps. You are creating a continuous line from the floor to the ceiling (or at least wall-to-wall). This eliminates the visual clutter of multiple furniture edges competing for your attention. Freestanding units also have fixed cable management holes that never seem to be where you actually need them. You end up with a 'cable waterfall' spilling out the back.
I have assembled enough flat-pack consoles to know that even the 'sturdy' ones start to bow under the weight of a 75-inch screen and a couple of heavy speakers. Built-ins are typically constructed from 3/4-inch plywood or solid timber frames anchored directly into your wall studs. They don't wobble, they don't sag, and they don't look like they were bought during a late-night panic scroll.
How a Living Room Built In TV Cabinet Fixes the Flow
The magic of a living room built in tv cabinet is how it manipulates the scale of the room. By taking the cabinetry wall-to-wall, you are drawing the eye across the full width of the space. This is a classic trick for making narrow rooms feel significantly larger. Instead of seeing a fireplace, then a gap, then a TV stand, then another gap, your brain registers one singular, architectural feature.
It anchors the room. In most living areas, the TV is the 'black hole'—a giant dark rectangle that sucks the life out of the decor. When you surround that TV with custom cabinetry, integrated lighting, and curated shelving, the screen becomes just one part of a larger composition. It stops being the focal point and starts being a feature of the wall itself.
I always recommend taking the cabinetry all the way to the ceiling if your budget allows. This avoids the 'dust shelf' on top of the cabinets and makes the ceilings feel higher. If you have crown molding, you can wrap it around the top of the built-ins to make it look like the house was literally built around your media center. That is the kind of detail that makes a home feel like an adult lives there, rather than a college student who just upgraded their TV.
Getting the Depth Right for Media Room Built Ins
This is where most people mess up. They make the cabinets too shallow. A standard bookshelf is 11 to 12 inches deep, which is fine for novels, but a modern AV receiver is usually 14 to 16 inches deep once you plug in the HDMI cables. If you build your media room built ins at 12 inches, you will be staring at wires or keeping the doors open just to fit your gear.
I suggest a 'staggered' depth approach. Make the lower cabinets 18 to 20 inches deep. This gives you plenty of room for heat dissipation and cable management. Then, make the upper shelving or the TV bridge about 12 to 14 inches deep. This creates a handy ledge (the 'countertop' of the built-in) and prevents the upper portion from feeling like it is looming over you while you watch a movie.
Hiding the Ugly Stuff (While Displaying the Good Stuff)
The greatest luxury of media room built in cabinets is the ability to hide the chaos. We all have it: the router with the blinking blue light, the tangled mess of Nintendo Switch docks, and the subwoofer that looks like a black plastic box. Closed lower cabinetry with vented doors or infrared-friendly mesh allows you to hide the tech while keeping it functional.
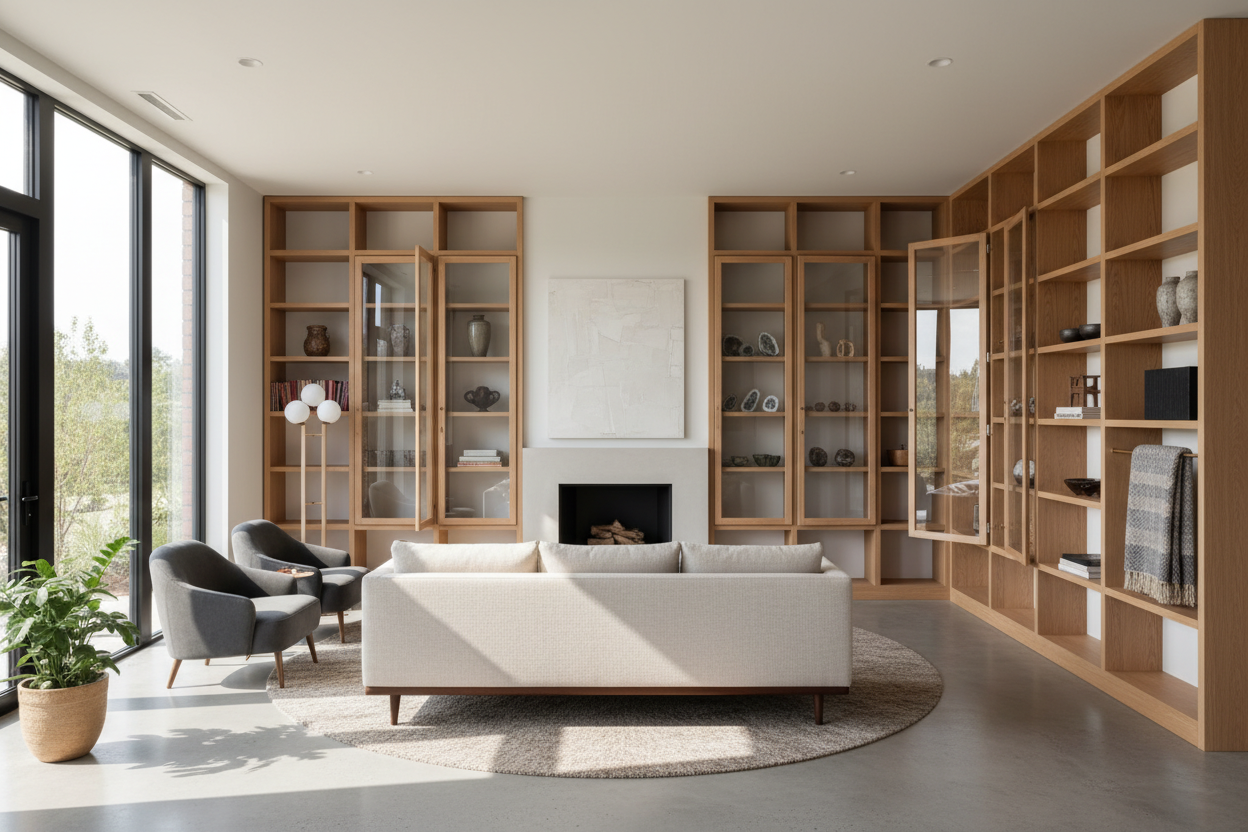
On the flip side, the upper portion of your built-in is where you get to be a human. Use open shelving to display your books, ceramics, or travel finds. If you want to keep the dust off your favorite collectibles but don't want a heavy solid door, you can incorporate a display cabinet with glass doors into the upper section. This gives you the 'museum look' while protecting your stuff from the elements.
I personally love mixing materials here. Maybe the lower cabinets are a deep navy or a moody charcoal, but the 'countertop' is a warm white oak. This breaks up the vertical mass and makes the unit feel like a piece of high-end furniture rather than just a wall of storage. Don't forget to plan for lighting—small LED pucks or strip lights under the shelves can turn a dark alcove into a glowing feature at night.
Is a Custom Media Room Built In Actually Worth the Cost?
Let's be real: custom cabinetry is an investment. It is going to cost more than a trip to a Swedish furniture warehouse. But you have to look at the long-term value. A well-executed built-in is considered a permanent fixture of the home. Much like a custom built-in china cabinet in a dining room, it adds actual appraised value to your property.
You are paying for the lack of frustration. You are paying for the fact that you will never have to shop for a TV stand for this room ever again. You are paying for the 20 square feet of floor space you 'reclaimed' from the dust bunnies. When I finally installed mine, the peace of mind of having every cord hidden and every book organized was worth every penny of the contractor's bill.
If the cost of a full custom build scares you, look into 'semi-custom' options. You can buy high-quality pre-made kitchen base cabinets, secure them to the wall with a 2x4 base, and add a custom top and trim. It gives you 90% of the look for about 40% of the price. Just don't skimp on the hardware; cheap hinges will sag within a year, and there is nothing sadder than a built-in with crooked doors.
My Own Built-In Blunder
I once tried to DIY a built-in using those cheap laminate bookcases you find at big-box stores. I shimmed them, I painted them, and I added trim. It looked 'okay' for about six months. Then the humidity hit, the MDF started to swell, and the shelves began to bow under the weight of my hardcover books. I ended up ripping it all out and starting over with real plywood. The lesson? If you are going to attach it to your house, use materials that are meant to last as long as the house does.
FAQ
How deep should media built-ins be?
Aim for 18 inches for the base cabinets to fit modern electronics and 12-14 inches for the upper shelves to keep the room feeling open.
Do built-ins make a room look smaller?
Actually, the opposite. By taking the cabinetry wall-to-wall, you eliminate visual breaks and make the floor plan feel more expansive and unified.
How do I handle heat for my electronics?
Always include ventilation. You can use decorative metal grilles in the door panels or leave a 2-inch gap behind the shelves for airflow to prevent your consoles from overheating.

Leave a comment
This site is protected by hCaptcha and the hCaptcha Privacy Policy and Terms of Service apply.