










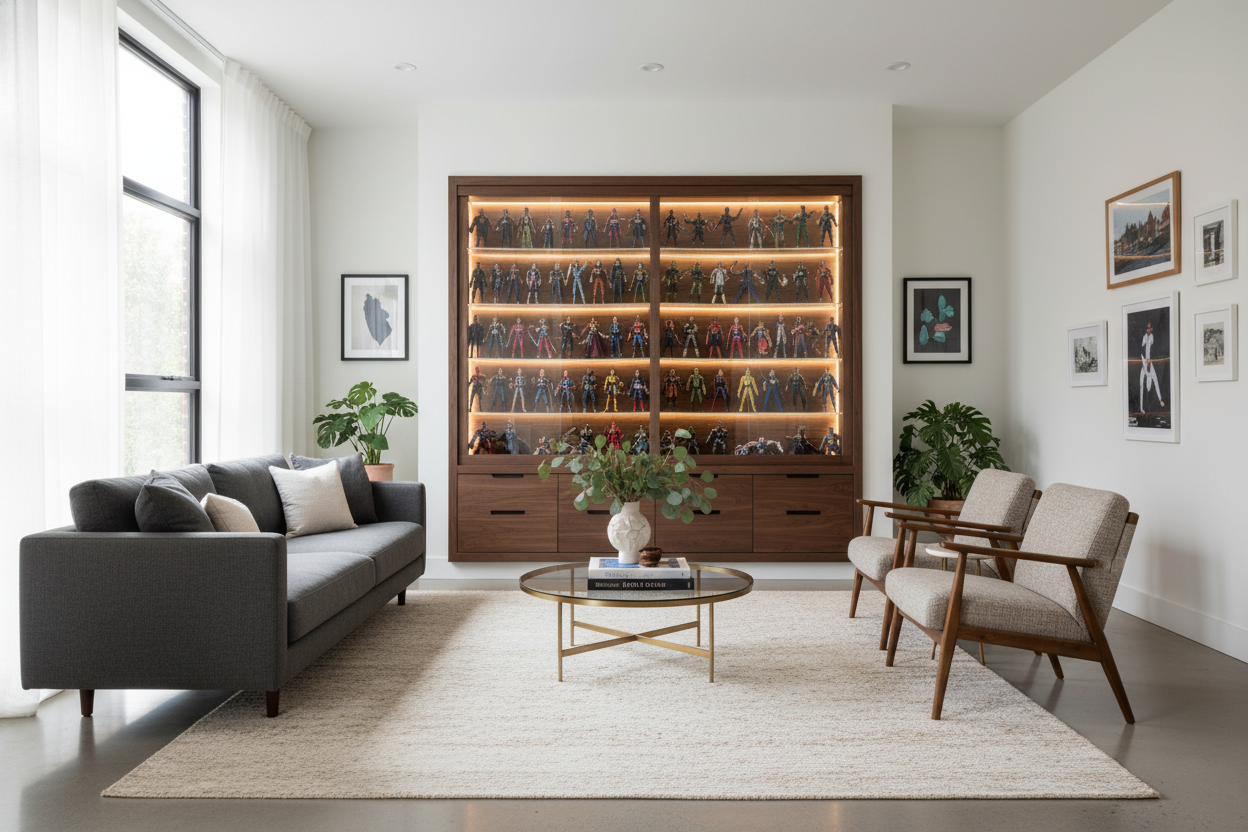
I spent three hours last Sunday with a microfiber cloth and a can of compressed air, meticulously cleaning the crevices of a 1:6 scale Batman. By the time I reached the third shelf, a slight breeze from the AC knocked over a Stormtrooper, who took out three Jedi like a pathetic plastic massacre. That was the moment I realized my open-shelf collection just looked like a cluttered mess. I decided it was time to build a diy action figure display case that actually protected my investment and my sanity.
- Acrylic sheets are 100% better than glass for DIY; they are lighter and won't shatter if a shelf fails.
- Use a dark, matte background like charcoal felt to make the figure colors pop.
- Integrated COB LED strips are the only way to get that museum-quality glow.
- A 6-to-8 inch depth is the sweet spot for most figures without eating up your whole room.
Why I Finally Gave Up on Standard Bookshelves
Open bookshelves are the enemy of anyone who values their free time. Every time you try to stop dusting every weekend, you realize the grime just comes back thicker, settling into the tiny joints of your figures. It’s a losing battle. Beyond the dust, standard shelves are just too deep. You end up with 'shelf shadows' where your figures in the back are basically invisible, or you're forced to buy those cheap plastic risers that look like they belong in a grocery store spice aisle.
I wanted something that felt intentional. My diy action figure display needed to be shallow enough that every figure was front-and-center, but enclosed enough that I could go six months without thinking about a microfiber cloth. I was tired of my living room looking like a toy store warehouse.
The Anatomy of a Good DIY Display Case for Action Figures
For a diy display case for action figures to look like furniture and not a hobby shop remnant, you need to focus on the framing and the background. I’ve seen people use white foam board, but it looks sterile and cheap. I went with 1x8 poplar wood for the frame. It’s a tight-grained wood that takes stain beautifully, unlike that flimsy pine you find in the bargain bin at the hardware store.
The background is where most people mess up. A glossy back reflects your room's clutter. I used a matte charcoal grey contact paper over a thin plywood backing. It absorbs light, which makes the plastic and paint of the figures stand out. It gives the whole setup a high-end, gallery vibe that doesn't scream 'I live in my parents' basement.'
The Materials You Actually Need (And What to Skip)
Skip the glass. Seriously. I know glass feels more 'premium,' but for a custom build, it’s a nightmare to cut and heavy as lead. Go to the hardware store and get 1/8-inch acrylic sheets. You can score and snap them yourself with a five-dollar tool. It’s safer, easier to mount, and virtually indistable from glass once it’s behind a frame.
As for the finish, avoid the 'all-in-one' stain and poly blends. They go on streaky and look like plastic. Buy a small can of oil-based walnut stain and a spray-on matte lacquer. It takes an extra hour of drying time, but the depth of color you get makes the wood look like a custom commission rather than a weekend project.
A Quick Note on Built-In Lighting
Lighting is what separates a box from a display. I used COB LED strips because they provide a continuous line of light without those annoying visible 'dots' that standard LEDs have. If you look at a professional display case with LED light, the light source is always tucked away. I routed a small channel in the top of the frame to hide the strip, so you see the glow, not the hardware.
Putting My DIY Action Figure Display Together
The assembly was a lesson in humility. I built the outer box first, then used a router to create a groove for the acrylic front to slide into. My biggest mistake? I didn't account for the thickness of the felt backing I added at the last minute. This meant my shelves were about 1/16th of an inch too long to fit inside the frame. I had to sand down twelve individual shelf edges by hand. It was soul-crushing, but the tight fit meant I didn't need to use ugly metal brackets.
I also learned that acrylic is a static magnet. Before you seal the front, wipe it down with an anti-static spray. I didn't, and for the first week, I watched every stray cat hair in the house migrate toward the inside of the case like it was a holy pilgrimage. I had to take the whole thing apart just to vacuum out the static-clinging lint.
When to Build vs. When to Just Buy a Cabinet
Building your own case is the only way to get a perfect fit for a specific wall or a specific collection size. But let's be real: it's a lot of work. If you don't own a miter saw or a router, the cost of tools alone will put you deep in the red. If you’re just looking for a clean, enclosed way to show off your stuff without the sawdust, buying a pre-made white display case with glass doors is a much smarter move for your Saturday afternoon.
However, if you want that custom, built-in look that makes your collection feel like a curated exhibit, the DIY route is unbeatable. There’s a specific pride in seeing your rarest figures sitting behind a frame you built with your own hands—and knowing you'll never have to dust them again.
FAQ
Is acrylic better than glass for figure displays?
Yes. It's lighter, harder to break, and easier to work with for custom sizes. Just make sure to get UV-resistant acrylic if your case is near a window to prevent your figures from fading.
How deep should an action figure shelf be?
Aim for 6 to 9 inches. Anything deeper and you lose the figures in the shadows; anything shallower and you can't do dynamic poses or use larger bases.
How do I hide the wires for the LED lights?
Route a small channel in the back of the wood frame or use adhesive wire clips tucked into the front corners where the frame hides them from view.


Dejar un comentario
Este sitio está protegido por hCaptcha y se aplican la Política de privacidad de hCaptcha y los Términos del servicio.