


I spent three years staring at a 55-inch TV perched on a mid-century modern console that was technically too small for the wall. Every time I sat on my sofa, my eyes drifted to the tangle of HDMI cables and the dust bunnies gathering behind the tapered legs. I realized that my 12-foot living room wall was mostly dead air, and no amount of 'curated' floating shelves was going to fix it. I needed a built in cabinet wall to reclaim my sanity and my square footage.
- Closed storage is the only way to truly hide tech clutter.
- Floor-to-ceiling units make 8-foot ceilings feel much higher.
- Stock upper cabinets are the budget-friendly secret for base units.
- Symmetry isn't mandatory, but visual balance is.
The Tipping Point: When Freestanding Storage Fails
The breaking point was a stack of board games that kept sliding off a 'minimalist' ladder shelf. I had three different styles of furniture on one wall—a metal media rack, a walnut console, and some oak floating shelves—and they were all fighting for attention. It was visual noise. I was losing about 30 square feet of potential storage because I wasn't using the vertical space.
I realized that freestanding furniture, no matter how pretty, often creates 'orphan' spaces. You know the ones: that weird six-inch gap between the cabinet and the wall that only collects cat hair. I wanted a seamless look that felt like part of the architecture, not just something I dragged in from a big-box store.
Planning My Wall of Built In Cabinets
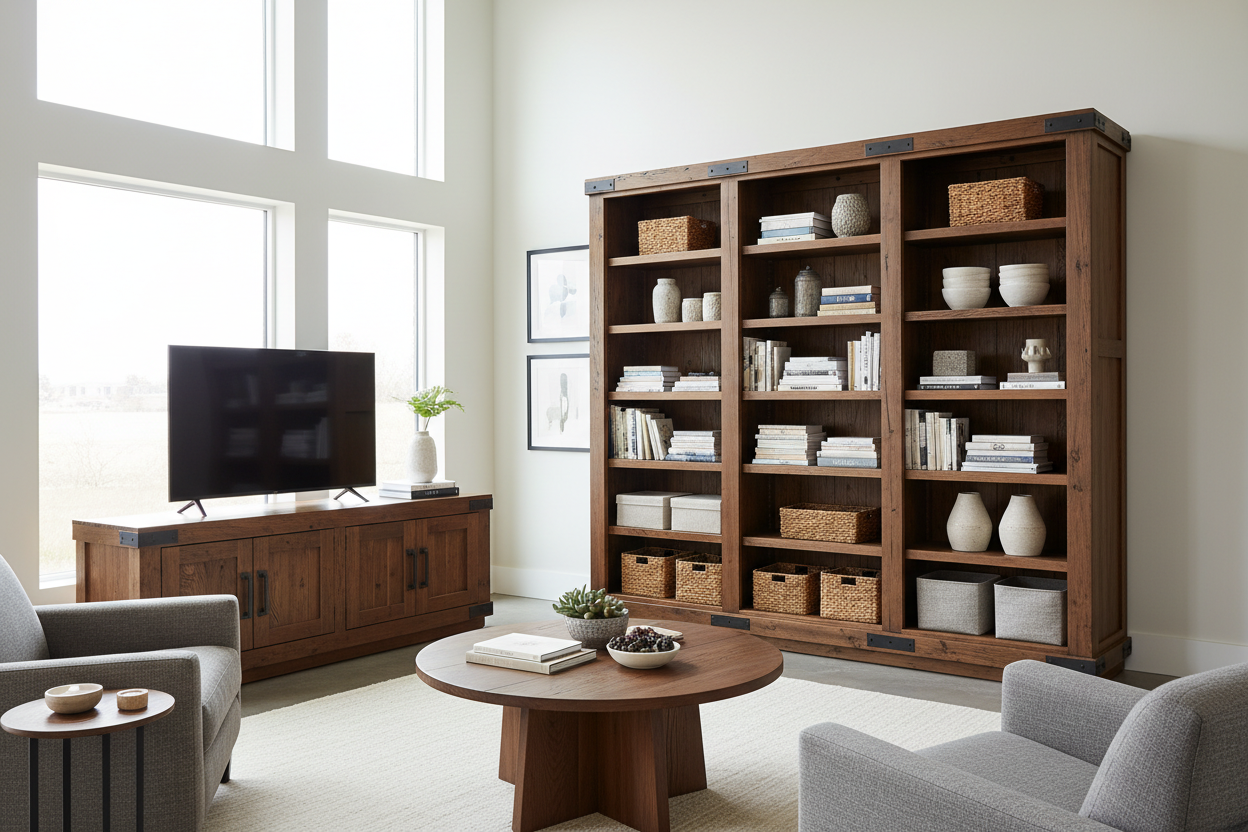
I spent weeks sketching layouts. I wanted a wall of built in cabinets that didn't feel like a stuffy library but also didn't look like a row of kitchen uppers. I followed the 80/20 rule: 80% closed storage on the bottom to hide the ugly stuff (routers, chargers, old DVDs) and 20% open shelving on top for the pretty things.
During the mood-boarding phase, I almost chickened out and bought a freestanding black cabinet with glass doors. It would have looked great, but it wouldn't have solved the 'dead air' problem on the ends of the wall. To make the wall feel balanced, I measured for 24-inch deep lower units and 12-inch deep uppers to keep the room from feeling closed in.
The Secret Hack: Using Wall Cabinets for Built-Ins
Here is the trick that saved me three thousand dollars: using wall cabinets for built-ins as your base units. Standard kitchen base cabinets are 24 inches deep, which can swallow a small living room. Instead, use 'over-the-fridge' wall cabinets. They are usually 12 to 15 inches deep and 12 to 24 inches high. I mounted mine on a 2x4 wooden frame to act as a toe kick, which brought them up to a comfortable height.
Once the boxes were up, the magic happened with the trim. To get that high-end built-in look, you have to use filler panels and wide crown molding. I used 1x4 pine boards to bridge the gaps between the cabinets and the side walls, then caulked every single seam. If you don't caulk, it just looks like a bunch of boxes. If you do, it looks like custom millwork.
Working Around the Fireplace and TV
My fireplace was off-center by about six inches—a common builder-grade crime. By framing it with the cabinetry, I was able to use slightly wider filler panels on one side to trick the eye into thinking everything was perfectly centered. I truly believe a fireplace wall is begging for custom built-in cabinets because it turns a flat, boring wall into a focal point with actual architectural depth.
For the TV, I left a recessed 'niche' in the center of the shelving. This allows the screen to sit flush with the front of the bookshelves rather than sticking out. Pro tip: run a PVC pipe behind the wall from the TV niche down to the lower cabinets. Now all my cords are invisible, but I can still swap out an HDMI cable without tearing the wall down.
The Big Reveal: Was the Mess Worth It?
The dust was everywhere for a week, and I definitely messed up the paint on the first pass. (Don't use flat paint on cabinets; use a high-quality urethane alkyd enamel or you'll see every fingerprint). But once the final coat dried, the room felt four feet wider. Because the storage is recessed into the visual background, the floor space feels open and clean.
I can now hide the PlayStation, the messy stacks of mail, and the dog's toy bin all behind closed doors. The room looks taller, the lighting hits the shelves perfectly, and for the first time, my living room feels finished. It wasn't the easiest DIY, but it's the one that made the biggest impact on how we actually live in the house.
How deep should built-in cabinets be?
For bookshelves, 12 inches is standard. For lower cabinets where you want to hide electronics or board games, 15 to 18 inches is the sweet spot. Anything deeper than 24 inches starts to eat too much floor space in a standard room.
Can I build these in a rental?
Probably not. These are permanent structures that are screwed into the wall studs and trimmed out with molding. If you're renting, look for 'wall-hugging' modular shelving that can be secured with simple anti-tip kits instead.
What is the best paint for built-ins?
Skip the standard latex wall paint. It stays 'tacky' and your books will literally stick to the shelves. Use a dedicated cabinet paint or a water-based alkyd. It cures much harder and handles the friction of sliding items across the surface.

Leave a comment
This site is protected by hCaptcha and the hCaptcha Privacy Policy and Terms of Service apply.