


I have spent way too many Friday nights staring at my TV setup, wondering why it looks like a college dorm room despite the adult price tag of the console. We have all seen those Pinterest-perfect living rooms where the shelves seem to glow from within, yet when we try it at home, it usually looks like a neon sign for a cheap motel. The difference between a high-end custom look and a messy DIY project usually comes down to how you handle your built in entertainment center lighting.
Getting that warm, architectural glow isn't about spending thousands on a lighting designer. It is about understanding how light interacts with wood, glass, and your own eyes. If you can see the lightbulb, you have already lost the battle. Here is how to fix it.
Quick Takeaways
- Never leave LED diodes exposed; always use a diffuser or a hidden channel.
- Stick to a warm color temperature (2700K to 3000K) to avoid a sterile hospital vibe.
- Prioritize backlighting for the TV to reduce eye strain during movie marathons.
- If you are buying new, pre-wired units save you from a cable management nightmare.
The 'Gamer Vibe' Mistake We're All Making
The biggest mistake I see is the 'slap and stick' method. You buy a $15 roll of color-changing LEDs from a big-box store, peel off the adhesive, and stick them right to the back of the TV. Suddenly, your cozy living room looks like a Twitch streamer's basement. It is harsh, the colors are rarely 'true,' and the light bounces off the wall in weird, uneven patches.
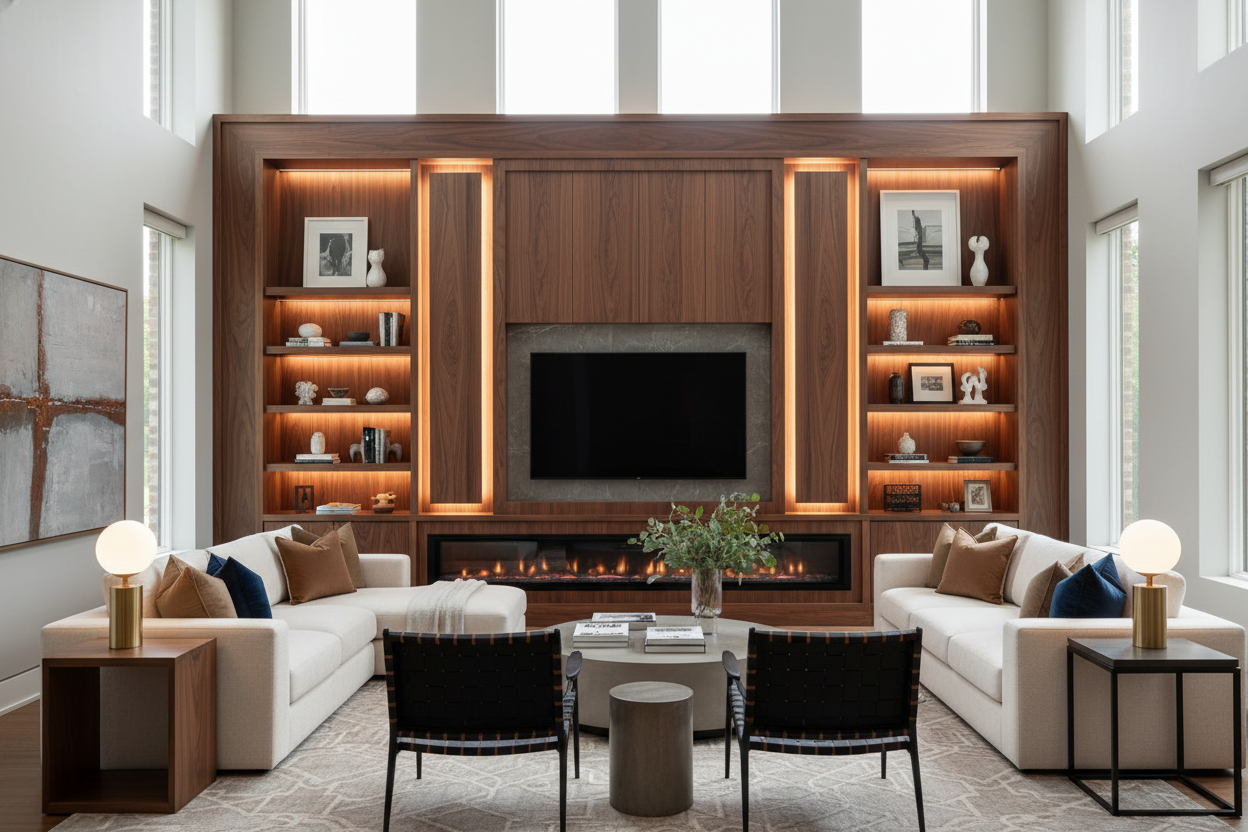
Intentional lighting is about layers. You want the light to feel like it is part of the furniture's DNA, not an afterthought you added because you were bored on a Tuesday. Real luxury comes from subtlety—a soft wash of light that makes the room feel expensive even when the TV is turned off.
Diffused vs. Direct: The Golden Rule of Cabinet Glow
If there is one rule I live by, it is this: hide the source. If I can see the individual little dots on an LED strip, I'm annoyed. Those 'hot spots' are the fastest way to make custom cabinetry look cheap. This is why display cases use built-in lighting that is tucked behind a lip or recessed into a channel.
Use aluminum LED channels with frosted covers. They cost very little but do two huge things: they act as a heat sink so your LEDs last longer, and they diffuse the light into a smooth, continuous beam. You want the light to wash over your books and ceramics, not blast them with tiny laser beams of white light.
Why Pre-Wired Units Usually Beat DIY Hacks
I once spent four hours trying to snake a ribbon cable through a tiny hole I drilled in a walnut cabinet, only to realize I’d pinched the wire and killed the whole circuit. It was infuriating. DIY lighting often leads to a 'rat's nest' of power bricks and messy wires hanging behind the shelves. If you are currently upgrading your entertainment center, look for units that have integrated wire management or pre-cut channels.
A unit designed with lighting in mind will have 'pass-throughs' for cables to move between shelves without being seen. It makes the final result look seamless. You want to see the glow, not the three-prong plug and the messy black cord dangling down to the baseboard.
Getting the Color Temperature Exactly Right
Color temperature is measured in Kelvin, and most people get this wrong. Cheap LEDs are often 5000K, which is a cold, blue-ish light that makes your skin look gray and your living room feel like a pharmacy. For a living room, you want 2700K (Warm White) or 3000K (Soft White). This mimics the cozy glow of an old-school incandescent bulb.
While mastering lighting in the office requires cooler, brighter light to keep you alert, your entertainment center is for winding down. 2700K is the sweet spot. It makes wood grains look richer and creates an atmosphere that actually helps you relax after a long day.
Should You Light the Shelves or the TV Backdrop?
The answer is usually both, but for different reasons. Lighting behind the TV, often called 'bias lighting,' is actually functional. It reduces the contrast between the bright screen and the dark room, which saves you from those 'TV headaches.' Use a dimmable strip here so it doesn't overpower the picture.
Shelf lighting is purely for the aesthetic. If you have glass door display cases, lighting from the top down through glass shelves creates a beautiful 'waterfall' effect. Just be careful not to overdo it—you aren't trying to light a stadium. You're trying to create a mood.
My Honest Mistake
I once installed a beautiful set of puck lights in a custom built-in I was very proud of. I didn't think about the 'throw' of the light. Because the shelves were deep, the front of my books was in total darkness while the back wall was blindingly bright. I ended up having to rip them out and move the lights to the front edge of the shelves, facing inward. Always test the position of your lights with blue painter's tape before you commit to drilling holes.
FAQ
What is the best brightness for entertainment center lights?
Look for strips that are dimmable. You want about 200-300 lumens per foot for accent lighting. Anything more is usually too bright for a dark room.
Can I use battery-powered lights?
I wouldn't. They start dimming after a few hours, and you'll get tired of recharging or replacing batteries every week. Hard-wired or plug-in sets are worth the extra effort.
What is the easiest way to hide wires?
Use self-adhesive cable raceways that match the color of your cabinet. They run along the inner corners and disappear if you're careful with the placement.
Leave a comment
This site is protected by hCaptcha and the hCaptcha Privacy Policy and Terms of Service apply.